Sump pumps play a vital role in preventing basement flooding by efficiently pumping out excess water that accumulates in a sump pit. To enhance their functionality and prevent water from flowing back into the pit, a check valve is an essential component. But when it comes to installing a check valve on your sump pump, getting the height right is crucial. In this blog, we’ll explore the factors to consider and the steps to take to ensure you install the check valve at the optimal height for your sump pump system.
The Importance of a Check Valve
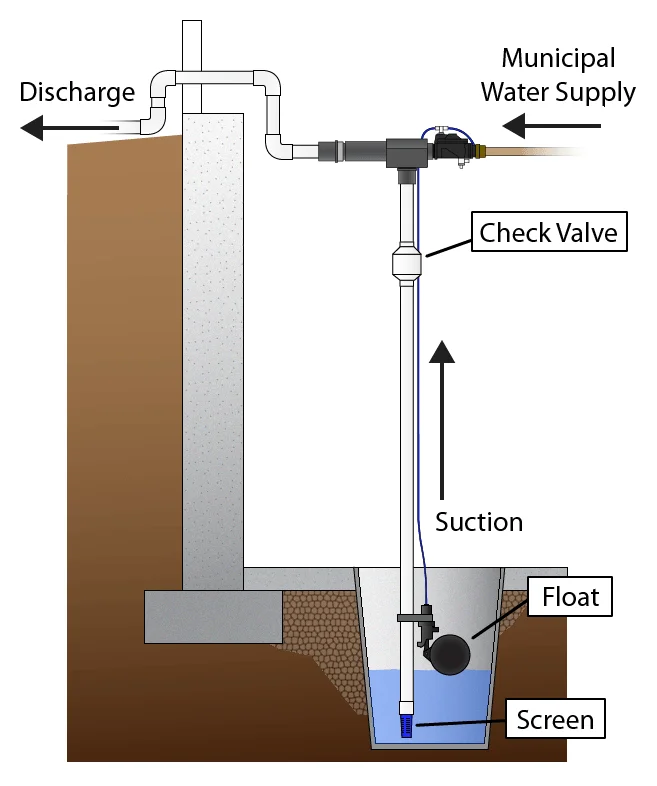
Before diving into the specifics of installation height, let’s quickly understand the role of a check valve. A check valve is a one-way valve that allows water to flow in only one direction. It’s typically installed on the discharge pipe of the sump pump. Its primary function is to prevent water from flowing back into the sump pit after the pump has turned off. This not only helps maintain the pump’s prime but also prevents the pump from working unnecessarily, extending its lifespan and ensuring efficient operation.
Determining the Ideal Installation Height
The height at which you install the check valve can significantly impact its effectiveness. Here are the key factors to consider:
Check Valve Design:
Check valves come in various designs, such as swing-style and spring-loaded.
- Swing-style check valves require less vertical space to operate effectively.
- Spring-loaded check valves, on the other hand, might need a bit more vertical clearance due to their design.
Manufacturer’s Recommendations:
Always refer to the manufacturer’s instructions and recommendations for installing the check valve. Manufacturers often provide guidelines on the optimal height to ensure proper functioning and longevity.
Vertical Space:
Measure the available vertical space between the sump pump discharge outlet and the highest point the water will reach in the discharge line. This measurement will guide you in choosing a check valve that fits within this space without causing any obstruction.
Steps to Properly Install the Check Valve
Once you’ve determined the appropriate height for your check valve installation, follow these steps:
Gather Tools and Materials:
pipe cutter (if necessary)
Prepare the Pipe:
If the discharge pipe is longer than needed, use a pipe cutter to trim it to the desired length. Ensure the cut is clean and free from burrs.
Apply Teflon Tape:
Wrap Teflon tape around the male threads of the discharge outlet. This helps create a watertight seal when you connect the check valve.
Install the Check Valve:
Screw the check valve onto the discharge outlet, making sure it’s tightly secured. Use a wrench to provide an extra turn for a snug fit, but avoid over-tightening.
Connect the Discharge Pipe:
Attach the discharge pipe to the other end of the check valve. Apply pipe cement to the pipe’s female threads and securely tighten it onto the valve.
Test the System:
Pour water into the sump pit until the pump activates. Observe the check valve to ensure it’s allowing water to flow out but not back in.
Common FAQs About Check Valve Installation for Sump Pumps
1. Why is a check valve important for a sump pump?
A check valve is crucial for a sump pump because it prevents water from flowing back into the sump pit after the pump has turned off. This maintains the pump’s prime, prevents unnecessary cycling, and extends the pump’s lifespan.
2. How do I know which type of check valve to choose for my sump pump system?
The choice of check valve depends on factors like available vertical space, the type of pump you have, and your budget. Swing-style check valves are often recommended for tighter spaces, while spring-loaded check valves might require more vertical clearance.
3. What happens if the check valve is installed at the wrong height?
If the check valve is installed too high or too low, it can lead to issues like water backflow, inefficient pump operation, and potential damage to the pump motor. Proper installation height is essential for the check valve to function effectively.
4. Are there any maintenance tasks associated with a sump pump check valve?
Regular inspection and cleaning are important maintenance tasks. Debris can sometimes get stuck in the check valve, affecting its performance. Ensure that the valve is clean and moves freely to allow water to flow in the desired direction.
5. Can I install the check valve horizontally or at an angle?
Check valves are designed to work vertically to ensure reliable closure and prevent water from flowing back. Installing a check valve at an angle or horizontally might compromise its functionality and lead to water leakage or reduced efficiency.
Conclusion
Installing a check valve at the correct height on your sump pump discharge line is essential for maintaining the efficiency and longevity of your sump pump system. By considering factors such as the type of check valve, manufacturer’s recommendations, and available vertical space, you can ensure a successful installation that prevents water from flowing back into the sump pit. Remember to follow proper installation steps and consult the manufacturer’s guidelines to achieve the best results.


