Sump pumps are one of the most important aspects of any drainage system, but they can be difficult to install.
The right location for the sump pit is crucial to the success of your system. If you don’t choose wisely, it could end up costing you more time and money in repairs down the road.
With this step-by-step guide, you’ll learn how to properly locate a sump pump pit and install an efficient sump pump that will keep your basement dry and free from flooding.
Bestselling Sump Pumps
1. Determine the right location for your sump pit
The first step in installing a sump pump is finding the right spot for your sump pit.
This is the basin where the pump will reside and collect any water that accumulates. The best place to put your pit is usually near where the water will collect during a storm, but not necessarily right where the water comes in.
Here are some things to consider:
- Consider where all the appliances and air ducts under your house drain into. If possible, try to avoid putting the sump pit near those as they can interfere with proper drainage into the pit.
- Sump pits should be dug at least 10 feet away from the house’s foundation.
- It might be a good idea to also avoid putting it right under major appliances such as water heaters, furnaces, or washing machines that have drained of their own because these appliances often vibrate and can cause some instability in the sump pit area.

If you live in an older home, you may want to look for a spot that has a lot of natural slopes to it. These types of locations tend to drain better than flat areas.
However, if you’re building a new home, you may want a flat area. In this case, you’ll want to make sure there’s room around the sump pump for easy access.
2. How deep should my sump pit be?
When digging your sump pit, it’s important to remember that the deeper the hole, the easier it will be to maintain. However, too deep of a pit can lead to problems like flooding and water damage.
On average, a sump pump should have at least a minimum of 24 inches and up to a depth of 36 inches clearance between the top of your pit and the bottom of the lowest point in your house.
Keep this in mind when choosing where to put your sump pit. If you plan on creating more than one level underneath your home for your system (more on that later) make sure to leave enough room for the lowest section you plan on having.
Once you’ve determined the size of your pit, use a shovel to outline its shape and then start digging.
It’s a good idea to have a friend help you with this step, especially if your soil is difficult to work with.
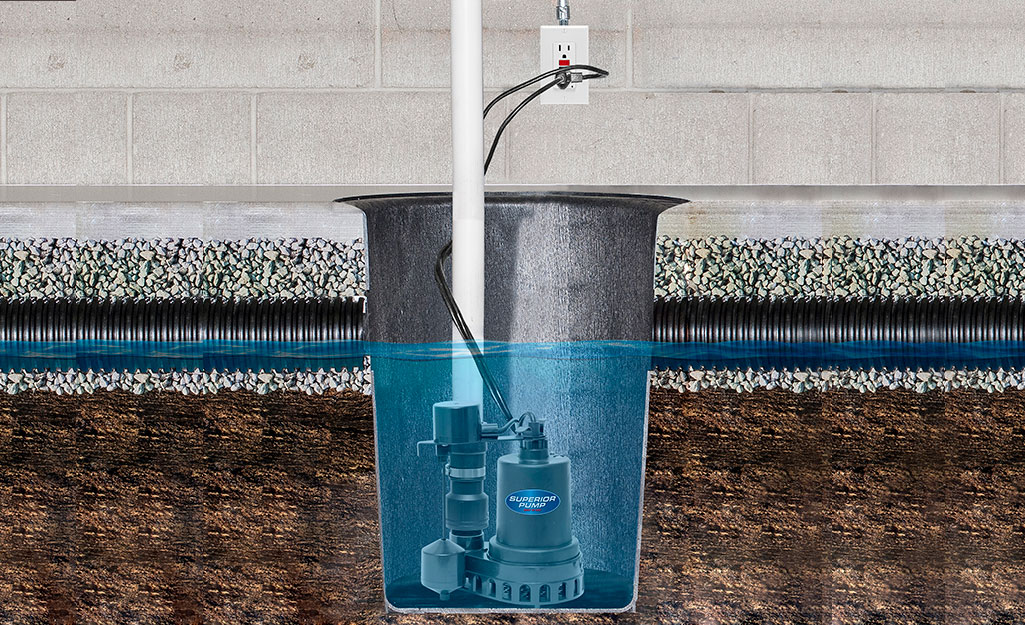
3. Installing the Sump Pump
Now that your pit is dug, it’s time to install the pump.
Read More: Types of Sump Pump
The specifics of this step will vary depending on the type of pump you purchase, so be sure to read the instructions carefully.
In general, you will want to place the pump in the center of the pit and make sure it is high enough that the pump’s power cord will have enough clearance from the bottom of the pit.

4 . Connecting the Discharge Pipe
The discharge pipe is what will carry the water from your sump pit to the outside of your home.
-If you purchased a submersible pump, it will come with a discharge hose that you can use to connect the pump to the discharge pipe.
-If your pump is not submersible, you will need to purchase a discharge hose.
-The discharge pipe should be placed at least 2 feet higher than the top of the sump pit and should slope gradually downward from the pump to the outside of your home.
-Be sure to attach a drain cap or spigot to the end of the hose so that you can attach a hose to drain the water away from your home.
5. Attaching Check Valve to Discharge Pipe
The check valve is a key part of your drainage system and should be attached to the discharge pipe as close to the pump as possible. This will help to prevent any backflow of water into the pit.
-If you purchased a submersible pump, the check valve should be attached to the discharge pipe before the pipe enters the sump pit. Place a rubber washer around it and tighten with a wrench or pliers.
If your pump is not submersible, attach the check valve to the bottom of your sump pit at its deepest point.
-Place a rubber washer around it and tighten with a wrench or pliers.
-Your check valve, whatever the type, should also be attached to the end of your discharge pipe that is closest to the pit opening using another rubber washer and wrench or pliers.
6. Connecting the Drainage System
The final step is connecting your drainage system to the sump pump hose.
Again, this will vary depending on where your drainage system is and what kind of plumbing you have, so be sure to read the instructions on your specific model.
This part of the process can also require some extra parts depending on how your drainage system is set up.
If you need more hose or elbows, it’s best to get those now rather than having to cut into the pipe again later.
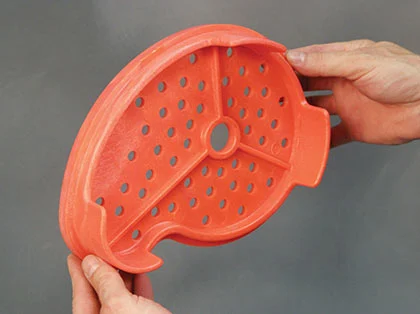
7. Installing Your Pit Cover
The very last step in setting up your sump pit system is to install the sump pump pit cover.
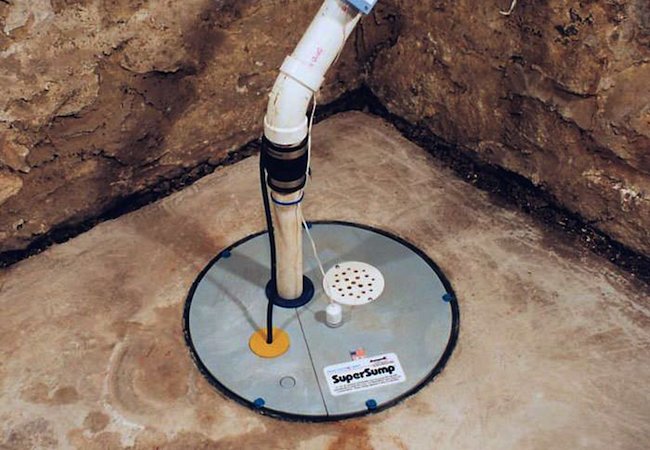
This will keep debris and animals out of the pit and help to protect the pump from the elements.
- The cover should have a tight fit and should be secured in place with screws or bolts.
- If it is an outdoor pit, make sure the cover has a drainage hole so that water can escape. You can even re-landscape the area around your pit, adding some plants or mulch to help disguise it from view.
- Make sure the cover has a label or tag that identifies it as a sump pit cover.
8. Testing the Sump Pump and Float Valve
Once your pit is all set up, it’s time to test the system.
Pour a few gallons of water into the pit. Once the water level reaches the pump’s float valve, the pump should turn on and start draining the water.
- If everything is working properly, the water level in the pit will slowly decline until it’s gone.
- If it doesn’t, you may need to adjust the float valve. (Some indoor sump pumps have an indicator light that lets you know when they are on and working.)
- Check for any leaks in the discharge pipe or check valve.
Read More: How Long Does a Sump Pump Typically Last?
9. Maintaining your Sump Pump
Now that your sump pump is installed and working properly, it’s important to keep some things in mind to ensure that it continues to run smoothly:
1. Keep the Pit Clean
- If sediment or debris builds up in the water, it can reduce the effectiveness of your pump.
- You should try to remove any solid particles that might accumulate in the pit by hand, but if you notice a buildup of sludge over time, you may want to consider cleaning out the sump pit more often.
2. Check the Water Level
- It’s a good idea to check the water level in your sump pit every so often, especially if you live in an area that is prone to flooding.
- The water should never rise above the pump’s intake level, or it could cause the pump to overheat or fail.
- If the water level starts to rise, turn off the power and try to find the source of the leak.
3. Check Your Pumps Regularly
- You should always check your pumps at least once every month, but you may want to perform routine maintenance more often if you live in an area that is prone to extreme weather or flooding disasters.
- If you have a submersible pump, you should also check the intake screen for any blockages every month.
4. Keep an Eye on the Weather
- One of the best ways to avoid a sump pump failure is to be prepared for bad weather.
- Make sure you keep an eye on any weather forecasts that might warn of heavy rain or high winds.
10. Protecting your Sump Pump from Flooding
Even with a well-maintained sump pump, there is always a chance of flooding.
- If you live in an area that is prone to flooding, it’s a good idea to have a backup sump pump on hand.
- If the power goes out, or if your main pump fails, the backup pump will kick in and start draining the water.
- You can also install a water alarm system to warn you when the water level in the pit gets too high.
- If you have a backup system, make sure it’s working properly and test the pump regularly.
- Keep an eye on any weather forecasts that might warn of heavy rain or high winds.
Protecting Your House from Flood Damage
Of course, the most important part of having a sump pit is to protect your house from flooding.
- Make sure the pit is located in a spot where the water will drain away from your house.
- If possible, try to keep the drainage path as short and direct as possible.
- If your house is already prone to flooding, you might want to consider installing a higher-capacity sump pump.
- Regularly check your home’s foundation for any cracks or signs of water damage.
- If you do find any damage, have it repaired as soon as possible.
The bottom line is that a sump pit can be a great way to protect your house from flooding and expensive water damage. But it’s important to remember that it’s only one part of a larger flood prevention strategy.
Bestselling Sump Pumps
Sump pumps are an important part of any home with a basement or crawl space. By taking the time to install one properly, you can rest assured that your family will be safe from potential water damage.
By following these simple tips, you can help to keep your house safe and dry during even the worst weather.
So, what are you waiting for? Start digging!